基于opencv和python的手指识别及追踪
| Finger Detection and Tracking using OpenCV and Python | 基于opencv和python的手指识别及追踪 |
| TL;DR. Code is here.
Tracking the movement of a finger is an important feature of many computer vision applications. In this application, A histogram based approach is used to separate out the hand from the background frame. Thresholding and Filtering techniques are used for background cancellation to obtain optimum results. One of the challenges that I faced in detecting fingers is differentiating a hand from the background and identifying the tip of a finger. I’ll show you my technique for tracking a finger, which I used in this project. To see finger detection and tracking in action check out this video. |
手指追踪是许多计算机视觉应用的重要特征。 在该应用中,使用基于直方图的方法将手与背景帧分离。 使用阈值处理和滤波技术来进行背景消除以获得最佳结果。 我在手指识别时遇到的挑战之一是将手与背景区分开并识别手指的尖端。 我将向您展示我用于手指跟踪的技术,我在此项目中使用了该技术。如果想要查看手指识别和跟踪的实际操作,请观看我上传的视频。 |
|
In an application where you want to track a user’s hand movement, skin color histogram will be very useful. This histogram is then used to subtracts the background from an image, only leaving parts of the image that contain skin tone. A much simpler method to detect skin would be to find pixels that are in a certain RGB or HSV range. If you want to know more about this approach follow here. The problem with the above approach is that changing light conditions and skin colors can really mess with the skin detection. While on the other hand, Histogram tends to be more accurate and takes into account the current light conditions.
|
在要跟踪用户手部移动的应用程序中,肤色直方图将非常有用。使用该直方图从图像中减去背景,仅留下包含肤色的图像部分。 检测皮肤的一种更简单的方法是找到特定 RGB 或 HSV 范围内的像素。如果您想了解更多有关此方法的信息,请点击此处。 上述方法的问题在于改变光线条件和肤色可能会使皮肤检测的结果很糟糕。另一方面,直方图往往更准确,并能够考虑到当前的光照条件。 |
|
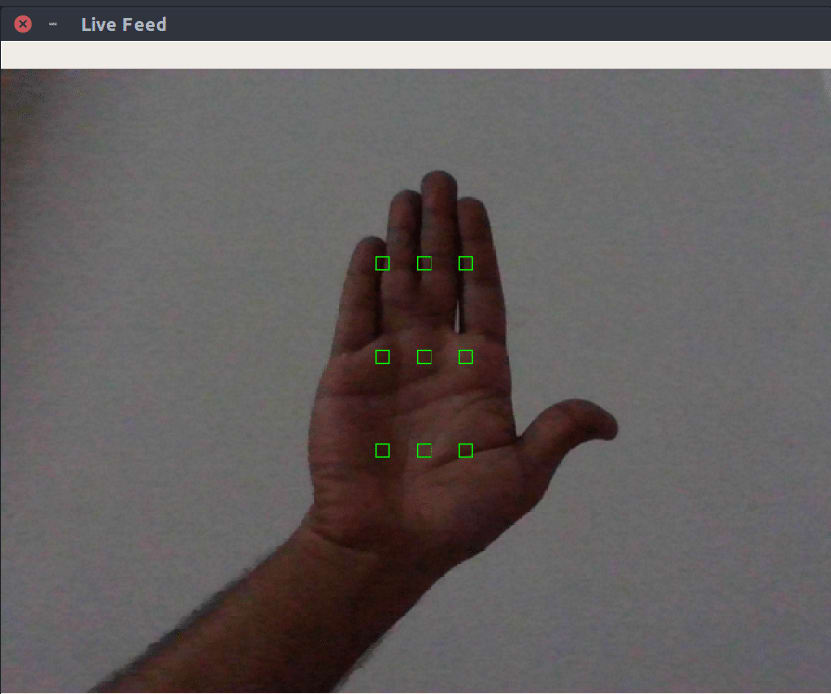
Green rectangles are drawn on the frame and the user places their hand inside these rectangles. Application is taking skin color samples from the user’s hand and then creates a histogram. The rectangles are drawn with the following function:
There’s nothing too complicated going on here. I have created four arrays Now that the user understands where to place his or her palm, the succeeding step is to extract pixels from these rectangles and use them to generate an HSV histogram. Here function transforms the input frame to HSV. Using Numpy, we create an image of size The Now that the user understands where to place his or her palm, the succeeding step is to extract pixels from these rectangles and use them to generate an HSV histogram.
Now that we hold a skin color histogram we can use it to find the components of the frame that contains skin. OpenCV provides us with a convenient method, |
在框架中绘制一个绿色的长方形并且用户将他们的手放置在长方形中。应用程序提取用户手掌的肤色,然后绘制成一个直方图。 绘制长方形的过程遵循以下函数: 这个过程非常简单 hand_rect_one_x hand_rect_one_y hand_rect_two_x hand_rect_two_y 我创建了四行代码来表示每个长方形的坐标。这四行代码不断迭代以在框架内使用 cv2.rectangle 绘制生成长方形 这里的 total_rectangle 表示行列的长度 9 现在用户理解了在哪里放置他们的手掌,接下来成功的关键步骤是从这些长方形中提取像素,然后基于像素生成 HSV 直方图 函数把输入框架转换成 HSV 直方图。使用 Numpy 库生成一张图像 图像大小为 [90*10] 颜色通道数为 3 我们将其命名为 ROI (Region of Interest). 它从绿色的长方形中提取了 900 个像素值,然后将它们放入 ROI 矩阵中。 cv2.calcHist 基于 ROI 矩阵给肤色创建了一个直方图并且 cv2.normalize 使用 norm 类型对矩阵进行归一化 cv2.NORM_MINMAX 现在我们可以用直方图来检测框架中的皮肤区域 现在基于肤色直方图我们可以找到包含皮肤的框架区域,OpenCV 提供了一个简便的方法 cv2.calvBackProject 该方法使用直方图来分离图像中的特征。我通过这个函数来把肤色直方图应用到框架中。如果你想获取更多关于 back project 的信息,可以通过 |
|
In the first two lines, I changed the input frame to HSV and then applied cv2.calcBackProject with the skin color histogram hist.
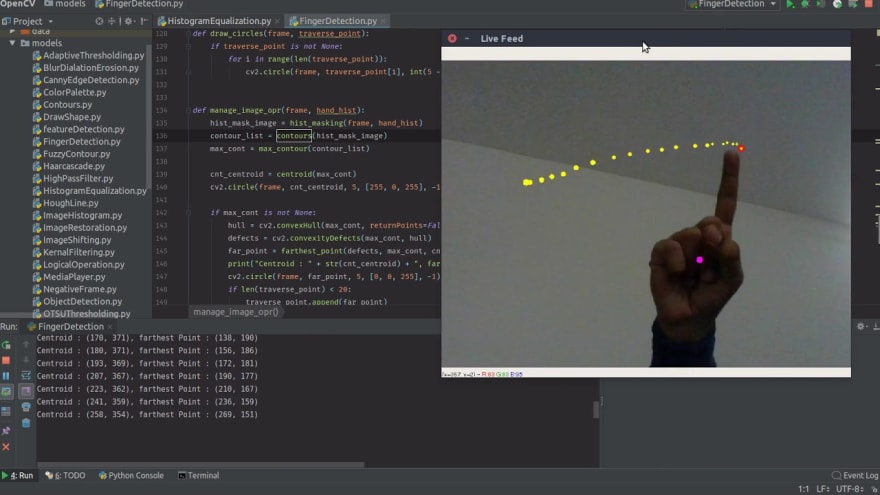
Now we have a frame with skin color regions only, but what we really In my application, I needed to find the tip of a finger with which a
Then it determines the largest contour. For the largest contour, it finds the hull, centroid, and defects.
Now that you have all these defects you find the one that is farthest
|
在头两行代码中,我把输入框架转换成 HSV 直方图 cv2.calcBackProject 然后应用到肤色直方图 基于以上过程,我使用 Filtering 以及 Thresholding 函数来平滑图像。最后,使用 cv2.bitwise_and 函数来遮盖输入框架的其他部分。 最后的框架图应该只包括肤色区域。 现在已有只包含肤色区域的框架,我们真正要做的是找到手指尖的位置。使用 OpenCV 可以找到框架中的轮廓 (Contour) 。如果你不知道轮廓是什么,你可以阅读 here。基于轮廓可以找到框架中的凸性缺陷,那很可能会是手指尖的位置。 在我的应用程序中,我需要找到手指尖的位置,这也是用户所需要的。 为了找到手指尖的位置,我决定先找到凸性缺陷的地方,并且是离轮廓质心最远的。该过程基于以下代码: 上述代码确定了最大的轮廓,以此找到包(hull),质心(centroid),缺陷(defects)。 现在已有框架中所有缺陷的位置,找到离轮廓中心最远的缺陷点。这个点很有可能会是指尖。中心是紫色的,最远的缺陷点是红色的。现在,已经找到了手指尖。 所有困难的地方已经完成,现在需要做的是创建一个列表来存储框架中变化的指尖位置。 存储变化点的数目由你决定,我只存储了 20 个位置。 最后,感谢你阅读这篇文章,你可以通过关注我的 Twitter 来获取更多我的文章 Twitter——iamapadandey,Github——amarlearning |
|
All hard part is done up until now, now all we have to do is to create a
Lastly, thank you for reading this post. For more awesome posts, you can also follow me on Twitter — iamarpandey, Github — amarlearning. |
到目前为止,所有困难部分都已完成,现在我们所要做的就是创建一个列表 list 去存储 farthest_point 在图像帧中被更改的位置。您想要存储多少到目前为止,所有困难部分都已完成,现在我们所要做的就是创建一个列表 list 去存储 farthest_point 在图像帧中被更改的位置。 您想要存储多少个更改点取决于您。而我只选择存储 20 个点。 最后,感谢您阅读这篇文章。对于更棒的帖子,你也可以在 Twitter 上关注我,我的 Twitter 地址是 https://twitter.com/iamarpandey,我的 Github 地址是 https://github.com/amarlearning。 |


2. 若遇到资源下载链接失效,请及时通过联系站长QQ以获取补发。
3. 所有本站资源仅供学习和研究目的使用。用户必须在24小时内删除所下载的资源,并严禁将其用于任何商业活动。对于因违反此规定引发的任何法律问题及连带责任,本站及发布者不承担任何责任。除非特别注明为原创,本站资源大多来源于网络,版权归原作者所有。若有侵权,请联系我们以便进行删除处理。
4. 本站提供的所有下载资源(包括软件等),我们保证未进行任何负面修改(不包括为改善功能或修复bug等正向优化或二次开发)。然而,我们无法保证资源的准确性、安全性和完整性。用户下载后应自行判断。本站旨在促进学习交流,并不保证所有源码完全无误或无bug。用户应明白,除非特别注明,【雾码资源】对提供下载的软件等不持有任何权利,其版权属于相应合法拥有者。
5. 请您仔细阅读以上内容,购买即表示您同意以上所有条款。
雾码资源 » 基于opencv和python的手指识别及追踪